There are no products listed under this category.
Shop by Category
-
Wico Magneto RX
- AX Magneto Brochure
- B Magneto RX
- F Series: F,FG,FGM,FGS
- A Magneto RX
- Condenser Information
- EK Magneto Rx
- LD and H Magneto RX
- OC Wico Magneto
- R Magneto Ignitor RX
- XH and XHD Magneto RX
- AH Wico magneto Rx
- AP Magneto RX
- C Magneto RX
- FW Series: Flywheel Magneto Service Info
- H1 Magneto RX
- J4 Manual
- JEM Manual
- PR Magneto RX
- Wico Magneto 1946 Catalog
-
Wico Magneto Application Information
- XVD-4 and XVD-6
- Bendix
- Berling Magnetos
-
Bosch, American Bosch, and Robert Bosch
-
American Bosch
-
Am Bosch Mags Ca 1945 MJA MJB MJC MVA MJK
- MRA Magneto American Bosch
- MRF American Bosch Magneto
- DU1,DU2,DU4..Ad nauseum Bosch Catalog 50
- Flywheel Magnetos by American Bosch
- Impulse Coupler RX
- Instruction Book & Agents 1925 Am Bosch
- Service Manual American Bosch Magneto 1928
- ZR4 For Ingersoll Rand Compressor
- ZR4 ZR6 Instruction Manual
- AB 33 and some mumblings on the AB34
- Application Information
- AT4 AT6 Bosch Magneto Instruction Parts Manual
- B4 + B6 Manual
- Bosch Magneto Service Parts List 1922
- DU Service Manual
- FX1 American Bosch Magneto Parts List
- Home of the Bosch Magneto
- MRD Am Bosch Magneto Service Manual
- MVA American Bosch Magneto Instruction Manual
- U1 U2 U4 U6 Debut Whatsa Matter U?
- ZR4 Service manual
-
Am Bosch Mags Ca 1945 MJA MJB MJC MVA MJK
- Bosch
- Robert Bosch
-
American Bosch
-
Edison Magneto
-
Eisemann
- CM4/CT4 Eisemann Magneto Instructions
-
Flywheel Magnetos by Eisemann
- Eisemann 61-D flywheel magneto
- Eisemann 61Cflywheel Mag
- eisemann 61DA Flywheel magneto
- Eisemann 61DC flywheel magneto
- Eisemann 61DE Flywheel magneto
- Eisemann 61DF Flywheel magneto
- Eisemann 61DH Flywheel magneto
- Eisemann 61NA flywheel magneto
- Eisemann 62-D Flywheel magneto
- Eisemann 72C Flywheel Magneto
- Eisemann 72D Maytag Magneto
- Eisemann 72DA Maytag Magneto Service
- Eisemann 82-D and 82-F Flywheel Mags
- M4G6 Eisemann Magneto Generator
- AM Series
- Automatic Spark Control Early
- CM-4 Caterpillar Magneto Service + Parts Manual
- CT-4 Caterpillar Magneto Service & Parts Manual
- EB
- ED EU EA
- Eisemann Catalog 1920
- Eisemann Catalog with Accessories
- Eisemann catalog 1915
- Eisemann- Caterpillar Parts Info
- EM Dual
- EM for Model T Ford
- G0 G1 G2 Service and Parts Manual
- G4
- GL Series Service & Parts Manual
- GL1 GL2 GLF1 GLF2
- GL4 GL2H
- GN6 Edition 3 Manual
- GN6 Edition 4
- GR4 Ed 2 magneto parts&Service manual
- GS Series
- GV Series Service and Parts Manual
- GV-4 GV-2H GV-2Q
- GV-6 Eisemann magneto
- RC/RT Series
-
Fairbanks Morse
- Fairbanks Morse Illustrated parts 1983 Sec 4
- Fairbanks Morse Magneto Application Information
- Fairbanks Morse Model "R" RX
- FM FM-H FM-K FMO FM-OH Heavy Duty Series RX
- FM-J1A.. FM-J1B.. Radio Shld 9864A
- FMJ Series Parts List 1947 Bulletin 9846B
- FMJ1A Instructions 1947 Bulletin 2888B
- FMJ1A.. FMJ1B.. 1947 Bulletin 2864B
- FMJ2 Series 2854C
- FMJ4A,B Instructions 1942 Bulletin 2846A
- FMJH Series: Mercury/Disston/Kiekhafer 9871A
- FMJV4B Wisconsin V4 Engine
- FMX. Series: AKA the Updated FMJ series
- Magnetizing Fairbanks Morse Magnetos
- RV RX
- Heinze AX & BX Magneto
- Ignition and Truck Profits
- International Harvester Magneto Rx
-
K-W Ignition Company Magnetos
- K-W Ignition Magneto Instruction Book 3Rd Ed
- K-W Low tension Magnetos catalog 19
- K-W Model J Magneto Manual
- K-W Model T and TK Magneto Instruction Book
- K-W O F Oscillating Magneto Manual
- K-W T TK TU TUK Magneto Catalog Ed 8
- K-W T TK TU TUK Magneto Manual Edition 6
- KW Magneto Promo What Makes Tractor Go?
- Perfection Magneto Company
- Pittsfield type B Magneto
- Remy
- Simms Magneto
- Simms Motor Units Catalog 1940
-
Splitdorf
- C Magneto Specifications
- C Magneto manual
-
Dixie and Aero Magnetos
- Dixie 46 246 462 Magneto Parts List
- Aero 448 449 648 649 Magneto
- Aero AE Magneto Manual
- Aero Magneto Catalog 1925
- Dixie 235 Oscillating Magneto
- Dixie 40 42 and 44 Magneto Manual N-404A 1919
- Dixie 46 Magneto Manual N-403C 1919
- Dixie 8 Cylinder Magnetos #83-86
- Dixie Aero Service Info
- Dixie Magneto Model 60 and 63 Catalog 1915
- Dixie Splitdorf Magneto Catalog N-401
- Splitdorf 46T and EM Impulse Starter
- Splitdorf Dixie M1 & M2 Magneto
- NS-1-2550 Magneto parts List
- NS-2 Magneto Parts list
- NS-4 Magneto parts List
- S-2 Magneto Parts List
- S-4 Magneto parts List
- SS-4 Magneto Parts List
- SS-6 Magneto Parts List
- SS-6-2 Magneto Parts List
- SSO Magneto Parts List
- AE
- Cross Country On Motorcycle
- NS Motorcycle Magneto Manual
- S NS SS B Magneto Service Manual
- Splitdorf Apelco Starting Lighting
- Splitdorf catalog 1910
- Splitdorf catalog 51 1913
- Splitdorf Magneto catalog 52 1914
- Splitdorf Magneto catalog 53 Models EU & EV
- Splitdorf Magneto catalog 57 1914
- Splitdorf Wiring Diagrams 1914
- U & V Splitdorf Magneto manual 1912
- Sumter Magneto Rx
- Webster
-
Wico Magneto RX
- AX Magneto Brochure
- B Magneto RX
- F Series: F,FG,FGM,FGS
- A Magneto RX
- Condenser Information
- EK Magneto Rx
- LD and H Magneto RX
- OC Wico Magneto
- R Magneto Ignitor RX
- XH and XHD Magneto RX
- AH Wico magneto Rx
- AP Magneto RX
- C Magneto RX
- FW Series: Flywheel Magneto Service Info
- H1 Magneto RX
- J4 Manual
- JEM Manual
- PR Magneto RX
- Wico Magneto 1946 Catalog
- Wico Magneto Application Information
- XVD-4 and XVD-6
- Bendix
- Berling Magnetos
- Bosch, American Bosch, and Robert Bosch
- Edison Magneto
-
Eisemann
- CM4/CT4 Eisemann Magneto Instructions
- Flywheel Magnetos by Eisemann
- M4G6 Eisemann Magneto Generator
- AM Series
- Automatic Spark Control Early
- CM-4 Caterpillar Magneto Service + Parts Manual
- CT-4 Caterpillar Magneto Service & Parts Manual
- EB
- ED EU EA
- Eisemann Catalog 1920
- Eisemann Catalog with Accessories
- Eisemann catalog 1915
- Eisemann- Caterpillar Parts Info
- EM Dual
- EM for Model T Ford
- G0 G1 G2 Service and Parts Manual
- G4
- GL Series Service & Parts Manual
- GL1 GL2 GLF1 GLF2
- GL4 GL2H
- GN6 Edition 3 Manual
- GN6 Edition 4
- GR4 Ed 2 magneto parts&Service manual
- GS Series
- GV Series Service and Parts Manual
- GV-4 GV-2H GV-2Q
- GV-6 Eisemann magneto
- RC/RT Series
-
Fairbanks Morse
- Fairbanks Morse Illustrated parts 1983 Sec 4
- Fairbanks Morse Magneto Application Information
- Fairbanks Morse Model "R" RX
- FM FM-H FM-K FMO FM-OH Heavy Duty Series RX
- FM-J1A.. FM-J1B.. Radio Shld 9864A
- FMJ Series Parts List 1947 Bulletin 9846B
- FMJ1A Instructions 1947 Bulletin 2888B
- FMJ1A.. FMJ1B.. 1947 Bulletin 2864B
- FMJ2 Series 2854C
- FMJ4A,B Instructions 1942 Bulletin 2846A
- FMJH Series: Mercury/Disston/Kiekhafer 9871A
- FMJV4B Wisconsin V4 Engine
- FMX. Series: AKA the Updated FMJ series
- Magnetizing Fairbanks Morse Magnetos
- RV RX
- Heinze AX & BX Magneto
- Ignition and Truck Profits
- International Harvester Magneto Rx
-
K-W Ignition Company Magnetos
- K-W Ignition Magneto Instruction Book 3Rd Ed
- K-W Low tension Magnetos catalog 19
- K-W Model J Magneto Manual
- K-W Model T and TK Magneto Instruction Book
- K-W O F Oscillating Magneto Manual
- K-W T TK TU TUK Magneto Catalog Ed 8
- K-W T TK TU TUK Magneto Manual Edition 6
- KW Magneto Promo What Makes Tractor Go?
- Perfection Magneto Company
- Pittsfield type B Magneto
- Remy
- Simms Magneto
- Simms Motor Units Catalog 1940
-
Splitdorf
- C Magneto Specifications
- C Magneto manual
- Dixie and Aero Magnetos
- NS-1-2550 Magneto parts List
- NS-2 Magneto Parts list
- NS-4 Magneto parts List
- S-2 Magneto Parts List
- S-4 Magneto parts List
- SS-4 Magneto Parts List
- SS-6 Magneto Parts List
- SS-6-2 Magneto Parts List
- SSO Magneto Parts List
- AE
- Cross Country On Motorcycle
- NS Motorcycle Magneto Manual
- S NS SS B Magneto Service Manual
- Splitdorf Apelco Starting Lighting
- Splitdorf catalog 1910
- Splitdorf catalog 51 1913
- Splitdorf Magneto catalog 52 1914
- Splitdorf Magneto catalog 53 Models EU & EV
- Splitdorf Magneto catalog 57 1914
- Splitdorf Wiring Diagrams 1914
- U & V Splitdorf Magneto manual 1912
- Sumter Magneto Rx
- Webster
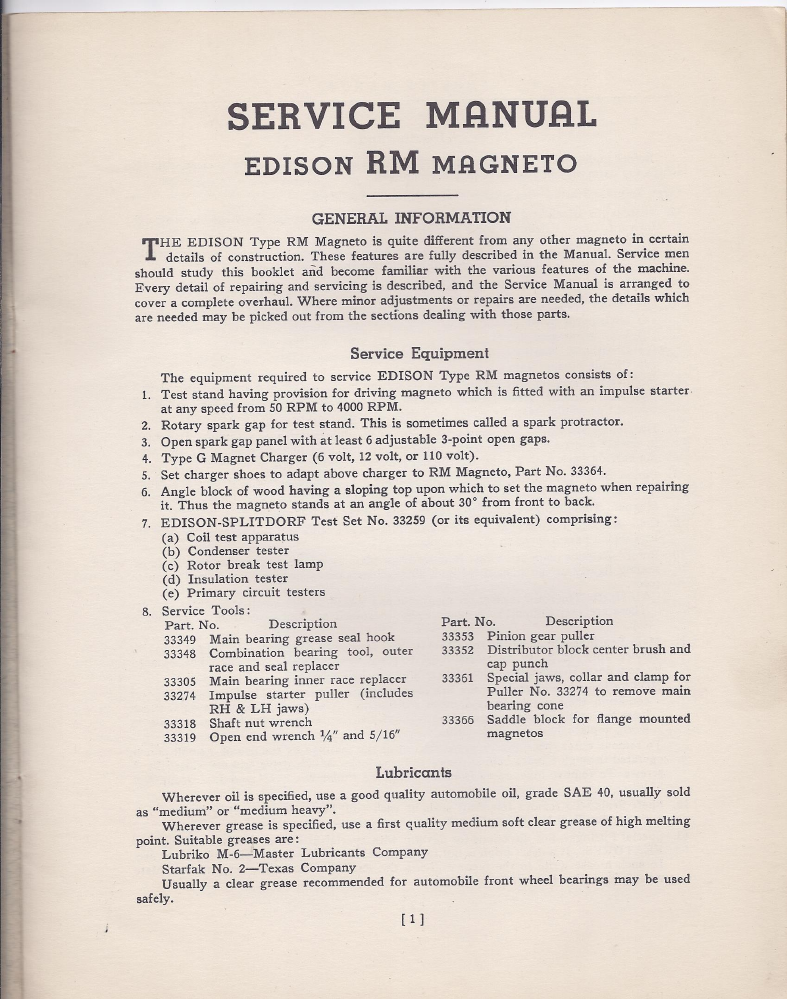
Edison Splitdorf RM Service Manual
Here is a factory service manual for the Edison Splitdorf RM to keep yours alive and well. If you are having trouble reassembling the impulse drive cup, you are not alone. Read on for sanity's sake.
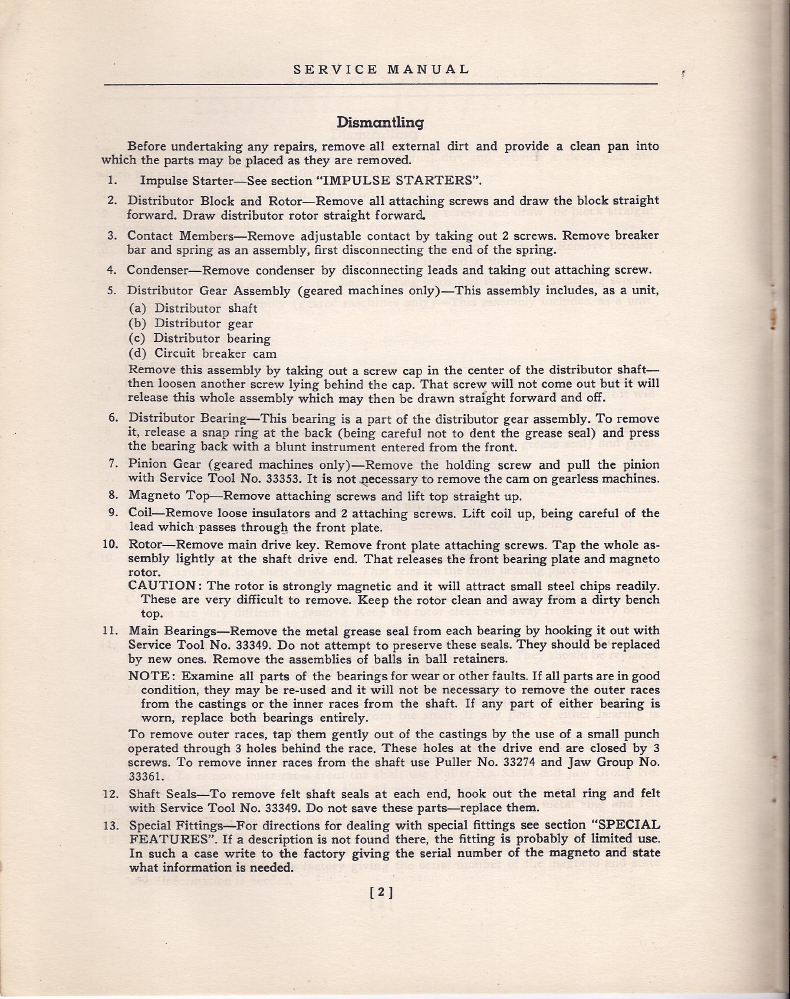
The best way to remove the metal grease retainers is to push on the bearing cage as evenly as possible so not to distort them. Use the end of a deep socket and a plastic mallet to correct any distortion. These must be reused as Mr Edison and Elvis have long since left the building. One should wash and repack the thrust ball bearings.Modern grease stored under ideal conditions is good for 30 years according to the literature. This is not modern grease and is less than ideal conditions.The seals may be carefully pushed back in place with a deep socket and extension.
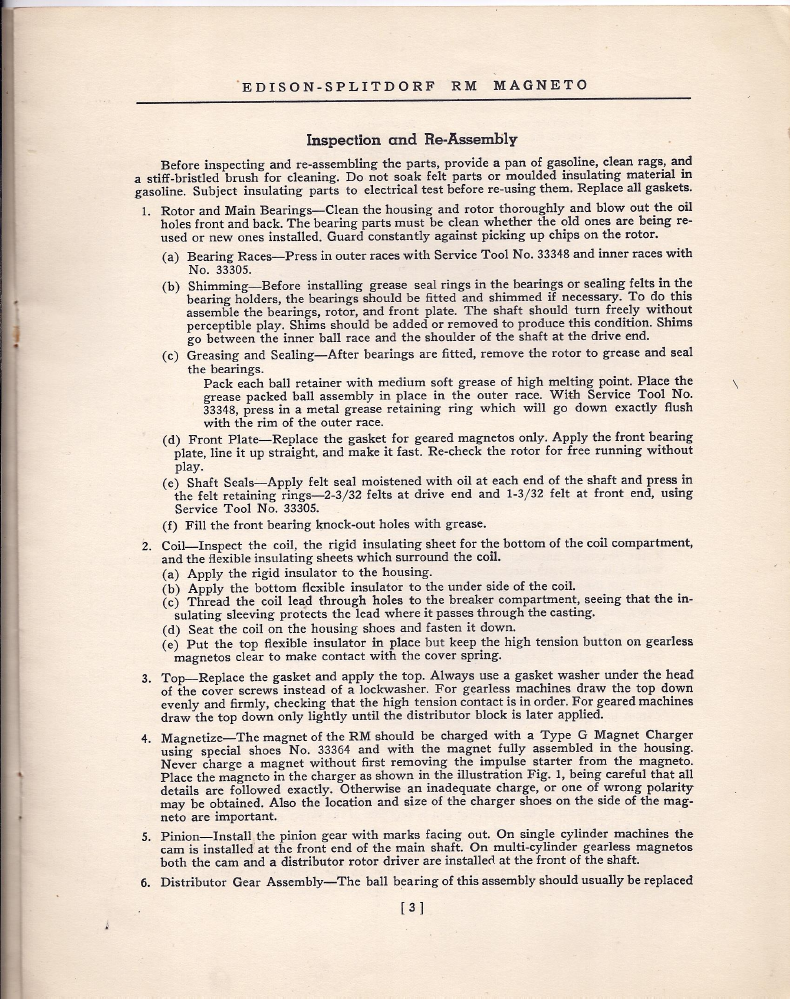
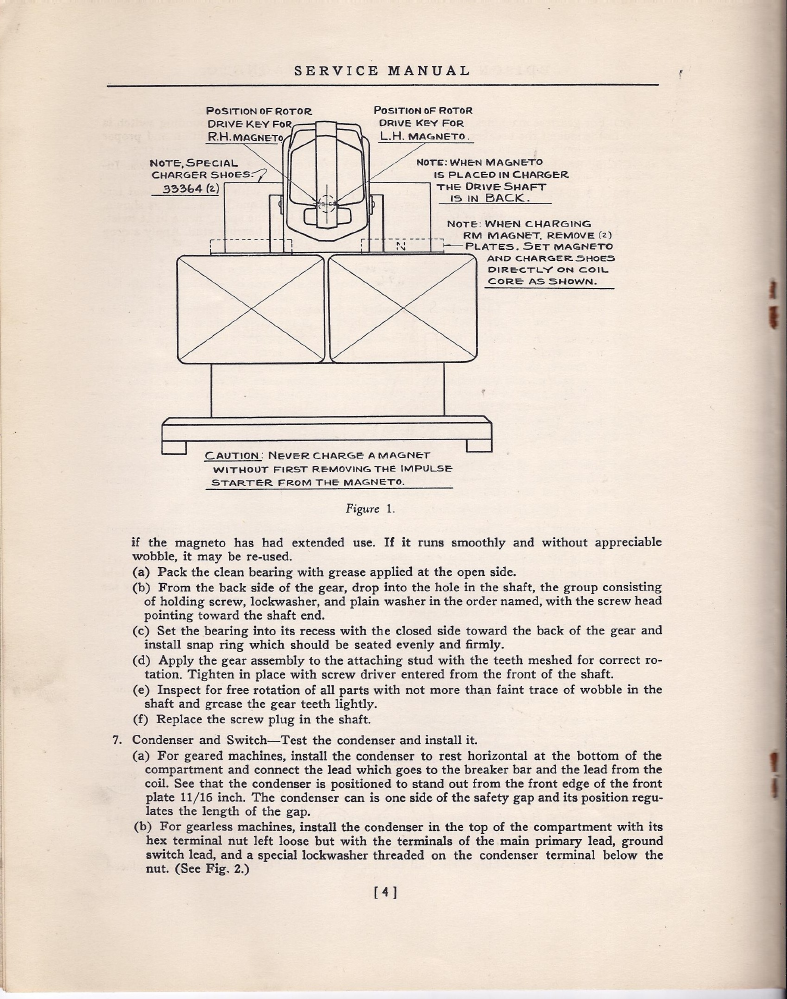
If you charge a magneto with the impulse installed the pawls may also get magnetized causing them to stick to the drive cup and not fall to engage the catch plate thus disabling the impulse and retard and possibly turning the tractor into an armbreaker. Always charge the magnets before installing the impulse coupler. If you manage to magnetize the pawls you can demag with an armature growler, just keeo it away from the magnets as it may demag them as well.
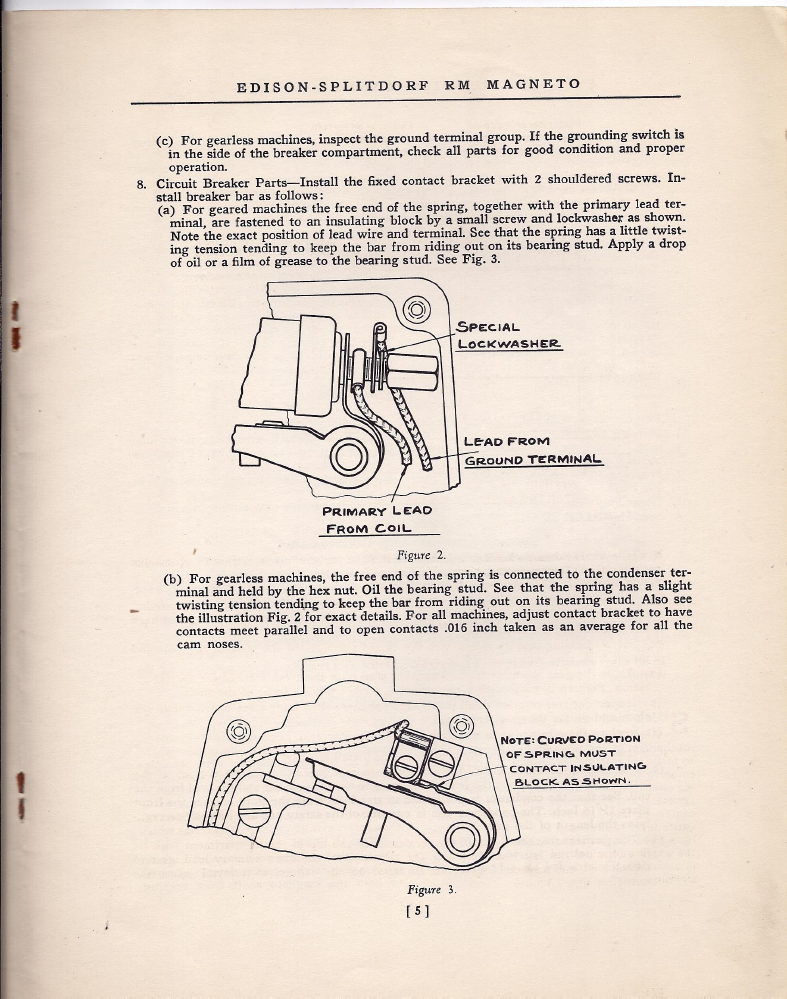
The condensers used in the single cylinder devices are notorious for electrical leakage and shorts and challenging to retrofit to say the least. The condensers used in the multi cylinder devices were much more robust and seldom failed.
The condenser used on single cylinder engines can be a major source of grief. Always check for leakage first then capacitance. Leakage is a big problem here. The condenser secures the points spring and there is not much real estate here making retrofit a challenge, but Mr Honda has a solution. The condenser for some of the early Honda cars can be used after taking the innards out of the original condenser as shown and preserving the insulated stud and nut where the points,coil and stop switch connect. Always file smooth any sharp edges near the condenser lead to prevent shorts. The condenser pigtail may be soldered to the center stud inside the can or connected outside with the coil,points etc. When soldering to the stud, be carefull not to get it too hot and damage the insulator.Not much real estate in there but it will fit. This condenser came from O'reilly Auto parts and is readily available, reasonably priced and designed as an ignition condenser.
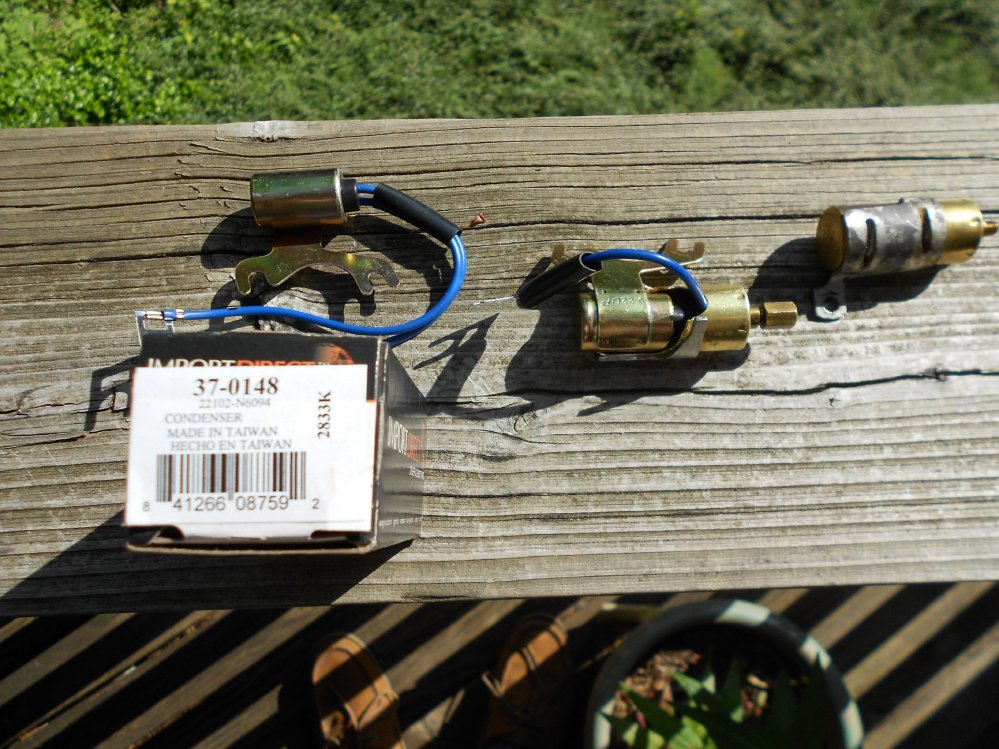
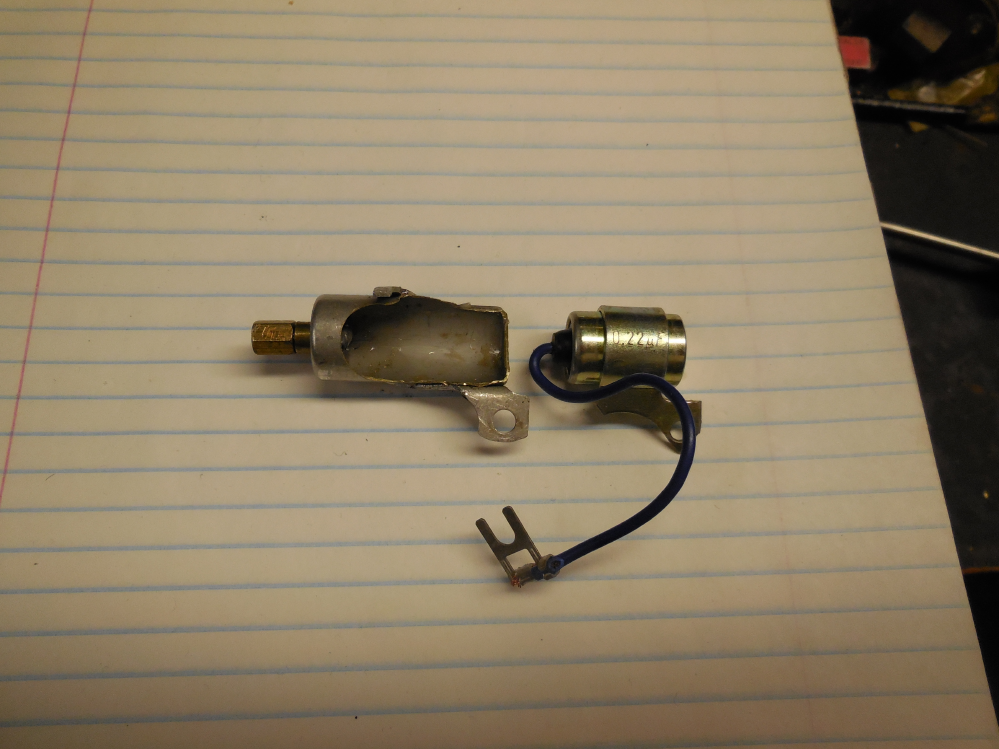
Once the innards are out of the original condenser, snip off the mounting leg of the Honda condenser nearest the pigtail. Snip off half of the rear mounting leg near the center of the U shaped channel and punch a hole near the center of the pointy feature to mount with the original condenser mounting screw and all will be well. The capacitance, .22MFD, shown as .22UF is stamped on the side of the device.Some electrical engineering geeks use the Greek letter Mu for Micro, hence the .22UF. This is a good retrofit and with polished points and a new coil will be good and hot.
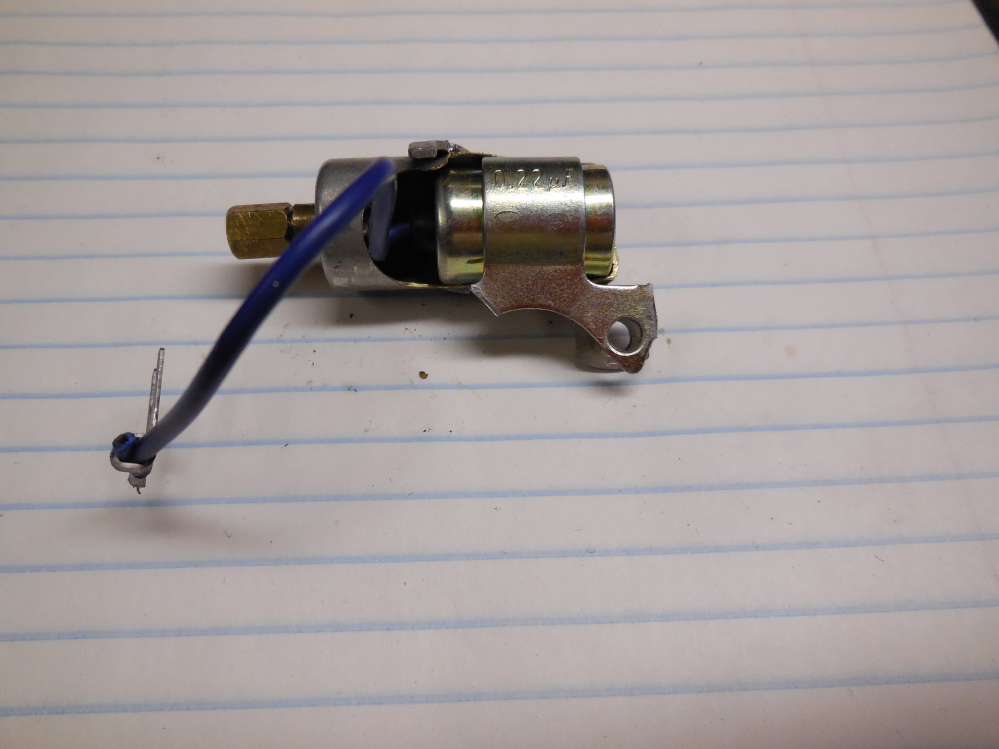
Next snip off and strip the pigtail, solder to the center of the terminal inside the case and slide it together.
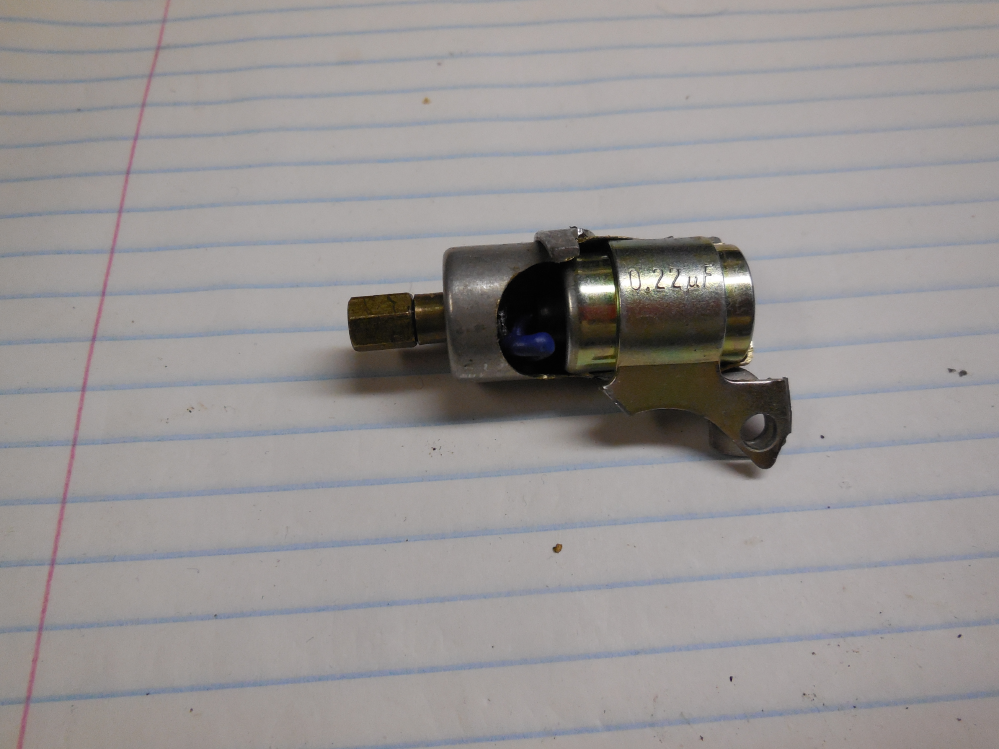
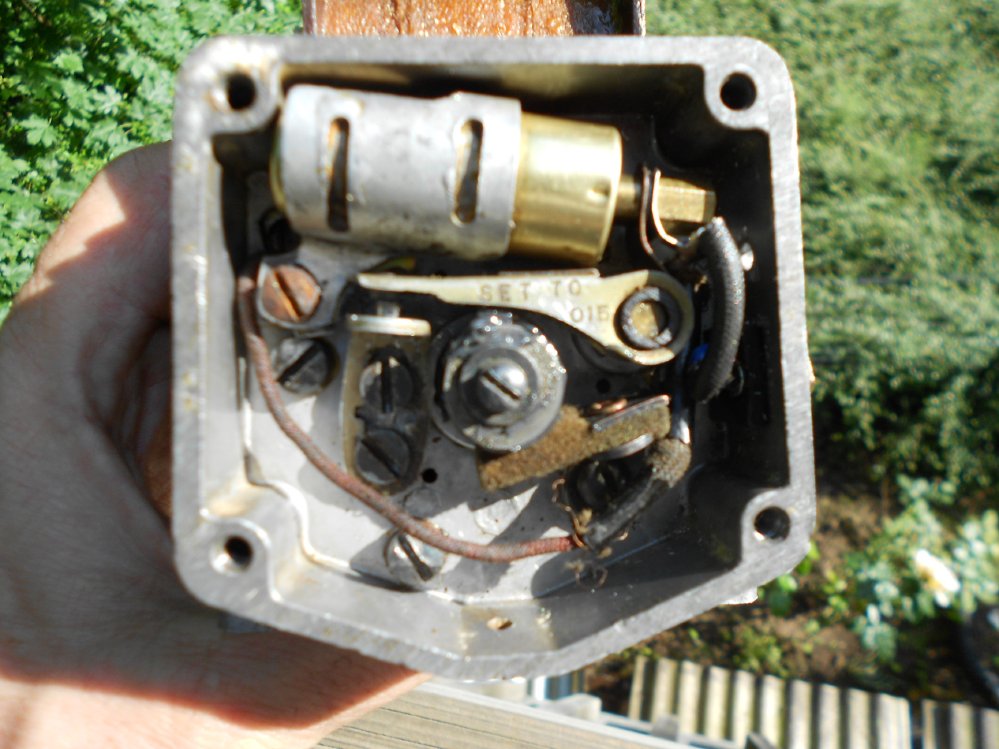
Retrofitted condenser in place. Use a hacksaw, Dremel Moto Tool or die grinder, to take the innards out, then make a slot down the side wall to make it easier to solder the pigtail to the center brass stud that secures the points spring, mindfull to avoid sharp edges that may pierce the pigtail insulation. This procedure makes them good and hot when all else is well.
Here is another way to attack the blessed condenser with a new capacitor retrofit. We use a Sprague/SBE/Vishay .15MFD 400 VDC 715P15 "Orange Drop" capacitor. TubesNMore AKA Antique Electonic Supply of Tempe, Az has these. They are very robust.
First slice the end of the can off about 1/8" with a Mototool and cutoff wheel, give it some heat with a heat gun to melt the tar, heat the solder on the stud with a soldering gun, then pull the innards out and clear out the excess tar.next slip som insulating paper inside the can, bend the capacitor leads as shown and slide it in place. It will be a sliding fit.
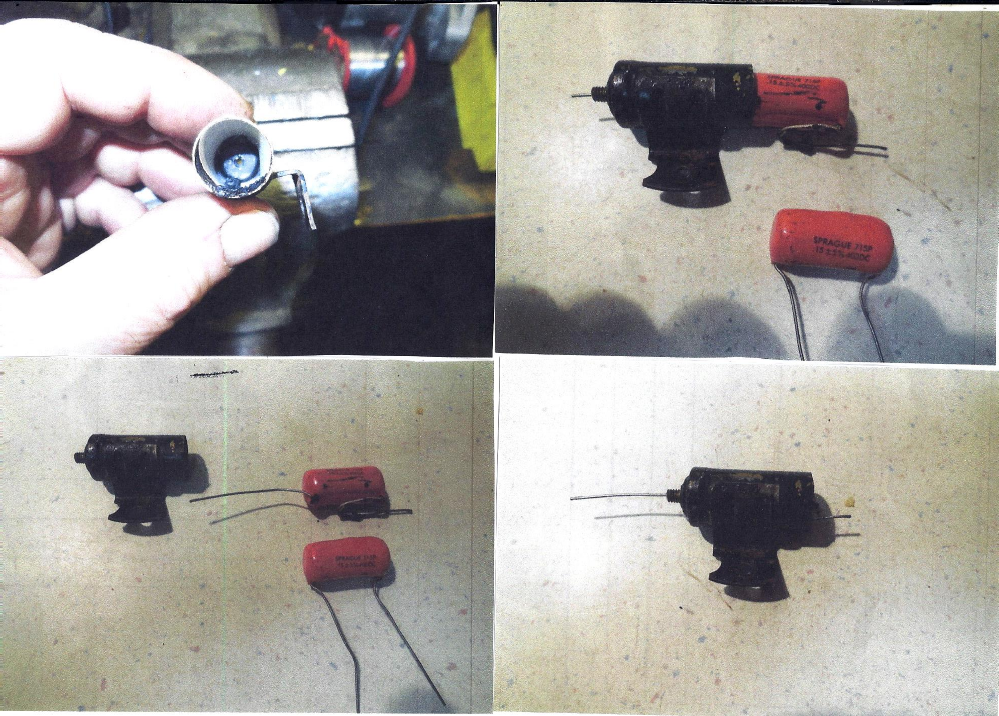
Once assembled, check for shorts, then solder the leads to the stud and case. This should end all the condenser woes.
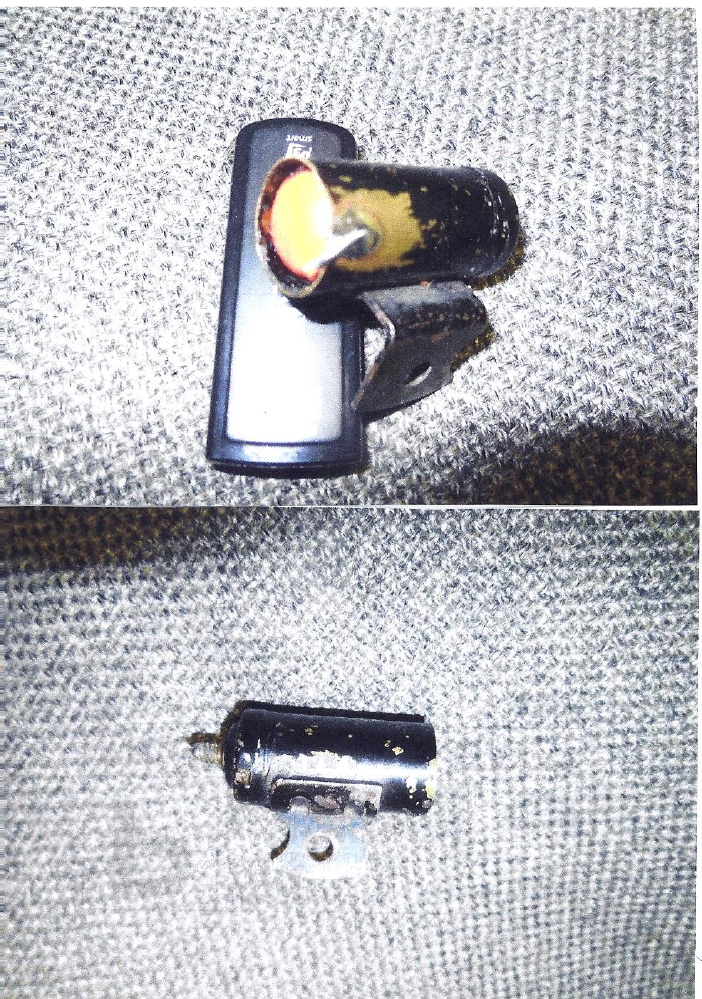
New capacito in place and ready to install. See you in the next millenia.
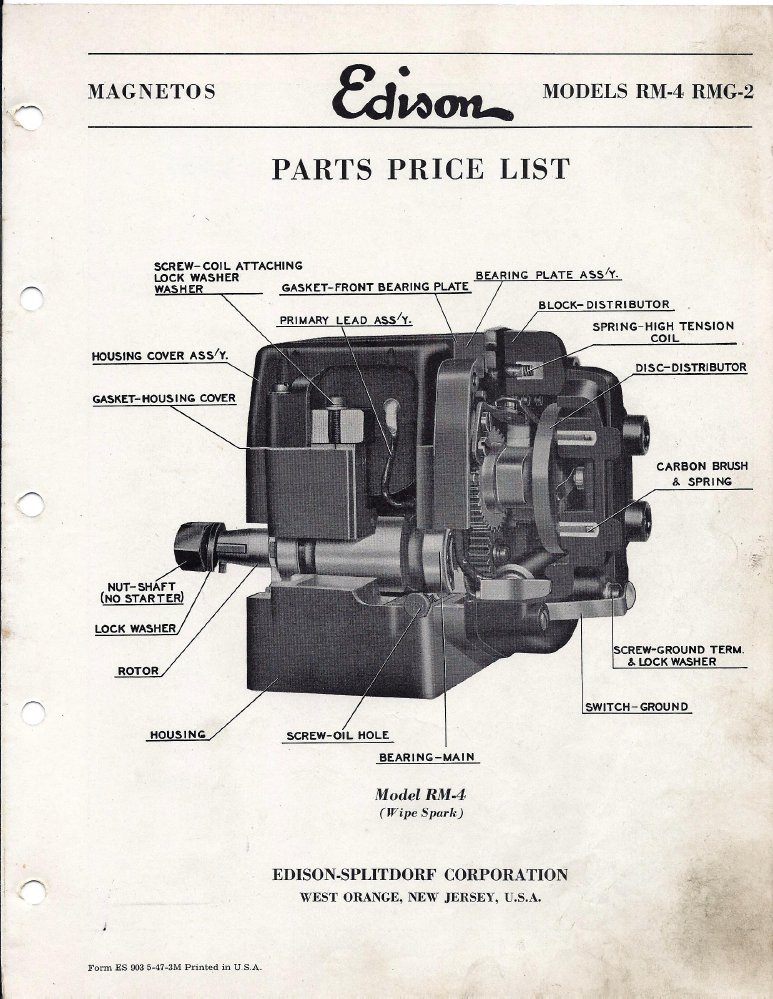
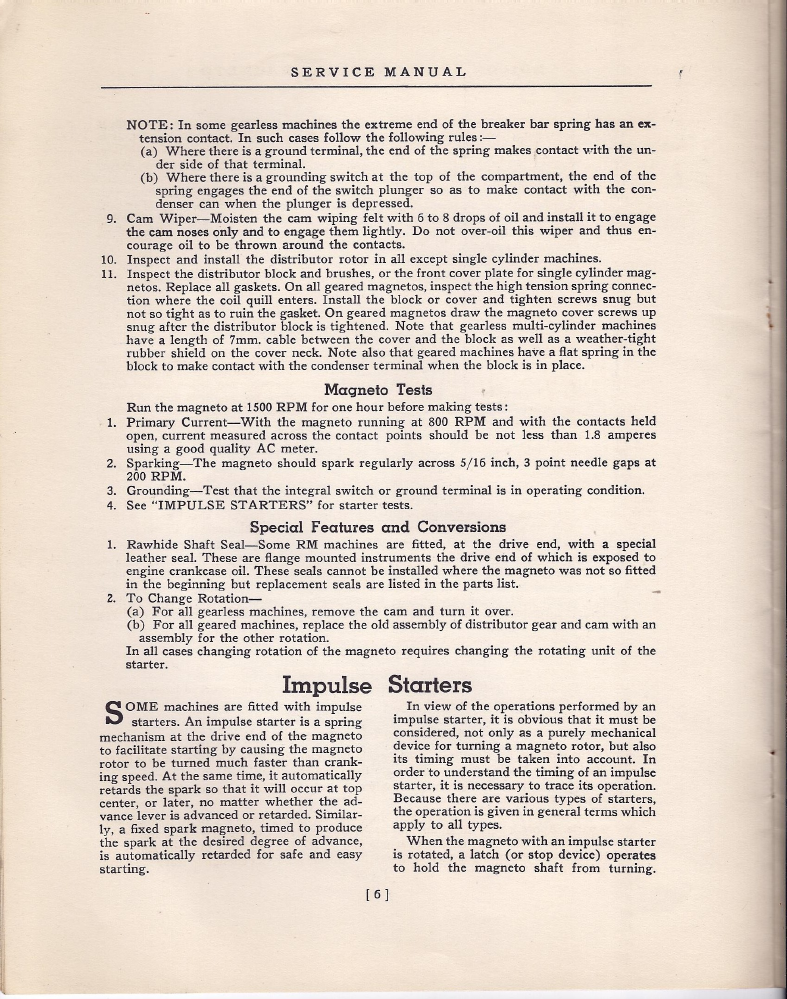
This procedure described below on line 6 is very helpfull. It is nearly impossible to wiggle it together otherwise. Always check the catch pin inside the impulse cup. Sometimes they can get loose and/or break off. If they are broken off or missing you can machine a new pin from a grade 8 bolt and use a roller from roller chain.
